Upgrading to a new SSD can significantly enhance your computer’s performance, whether upgrading to a larger SSD drive, a faster NVMe or M.2 SSD, or replacing an old SSD. For this reason, many users want to clone HDD to SSD for a better user experience. How do I transfer data from one SSD to another? Is it possible to transfer data from one SSD to another without losing data?
This post covers three methods to copy data from an old SSD to a new SSD:
- Use professional disk cloning software to migrate a whole SSD to another
- Use Windows Explorer to manually copy and paste files between SSDs
- Use Windows Backup and Restore to create a backup image and then restore
How to prepare for a successful SSD data transfer
Before diving into the methods, let’s see what you will need to do to enable a smooth and successful SSD-to-SSD data transfer:
- Ensure SSD compatibility. Confirm both SSDs use the same interface (e.g., SATA, PCIe, NVMe, M.2) and ensure the destination SSD fits the form factor of your device, such as 2.5-inch, M.2 2280, or M.2 2230.
- Ensure target SSD has enough space. When purchasing a new SSD, be sure to consider its storage capacity. It is acceptable if the target SSD is smaller than the source disk, but you must ensure it can accommodate all the data from the original disk. The target SSD disk should be larger than the used space on the source SSD drive.
- Clean up source SSD drive. The source SSD drive may contain numerous unnecessary or junk files, including temporary data, rarely used programs, duplicate files, caches, and corrupted files. The fewer files on the source drive, the shorter the time it will take for the data transfer.
- Connect destination SSD. You need to connect the target SSD drive to your computer for transferring data from one SSD to another. On a desktop, directly install the SSD alongside your old SSD. On a laptop, buy a SATA to USB cable or external hard drive enclosure to connect the target SSD via the USB port.
- Verify drive recognition. After connecting your new or larger SSD to your computer, ensure your PC can recognize it. To verify the recognition, go to Disk Management to confirm both SSDs are visible.
Method 1. Clone one SSD to another without losing data
Cloning is the best way to transfer all data, including Windows, programs, settings, and personal files, from one SSD to another. Some SSDs come with software to help transfer your data, such as those from Samsung, Seagate, WD, and Intel, which can assist in transferring data and Windows from one hard drive to another.
For SSDs without a cloning solution, you must use third-party SSD cloning software to enjoy a safe and secure cloning process because Windows lacks built-in cloning features. Clonezilla can help you clone SSD to a larger SSD for data or Windows transfer, but you must run it on a USB drive, which requires a high learning curve and is thus unsuitable for beginners.
Fortunately, this is no longer the case with EaseUS Disk Copy, a dedicated and professional disk cloning program with a highly streamlined interface for Windows computers. EaseUS SSD cloning software can move all data from one SSD to another without losing data or reinstalling Windows.
EaseUS cloning software can migrate the OS from the first SSD to the new one, transfer C drive to a new SSD, and transfer data from one SSD to another with only one slot on a laptop or PC.
Step-by-step guide on how to clone SSD to another SSD using EaseUS Disk Copy:
Step 1. Connect the target SSD to your PC. Install the SSD on your desktop or connect it to your laptop via the USB-to-SATA cable.
Step 2. Download and install EaseUS Disk Copy. Launch EaseUS SSD cloning software and click Disk Mode.
Step 3. Select the source and target SSD drive.
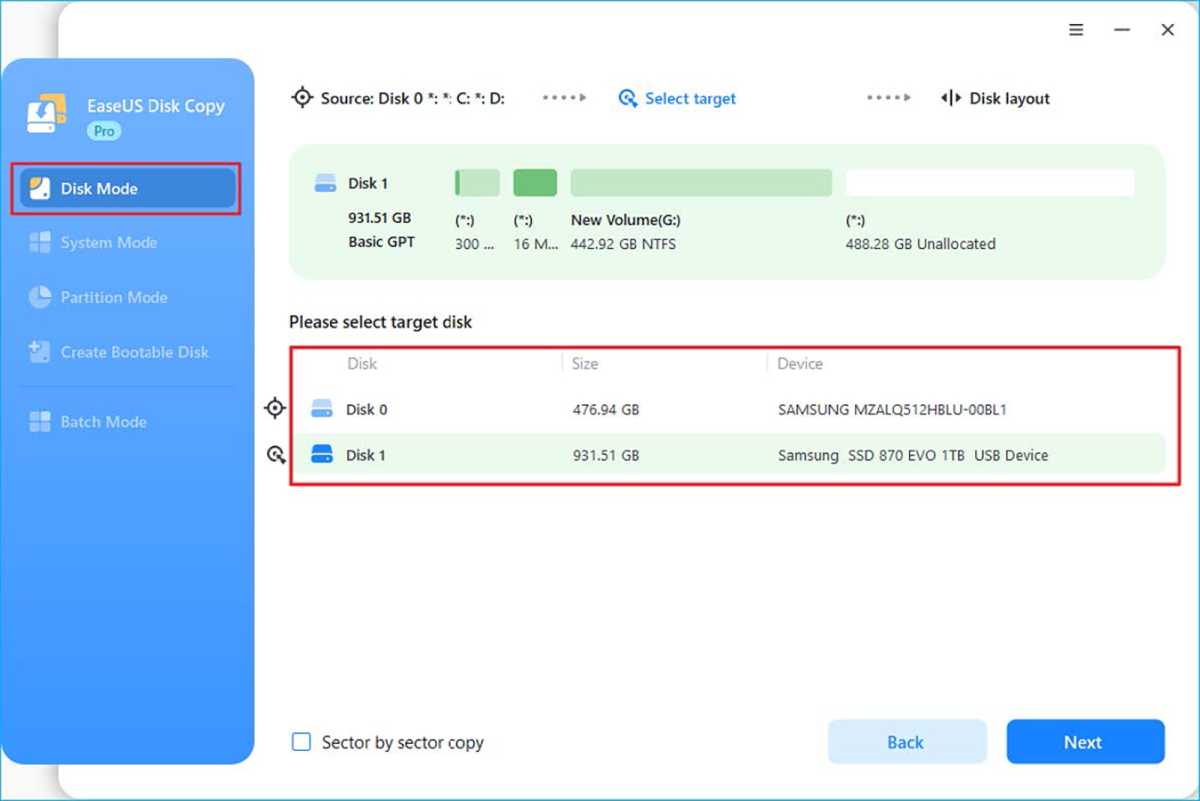
EaseUS
Step 4. Adjust disk layout (optional).
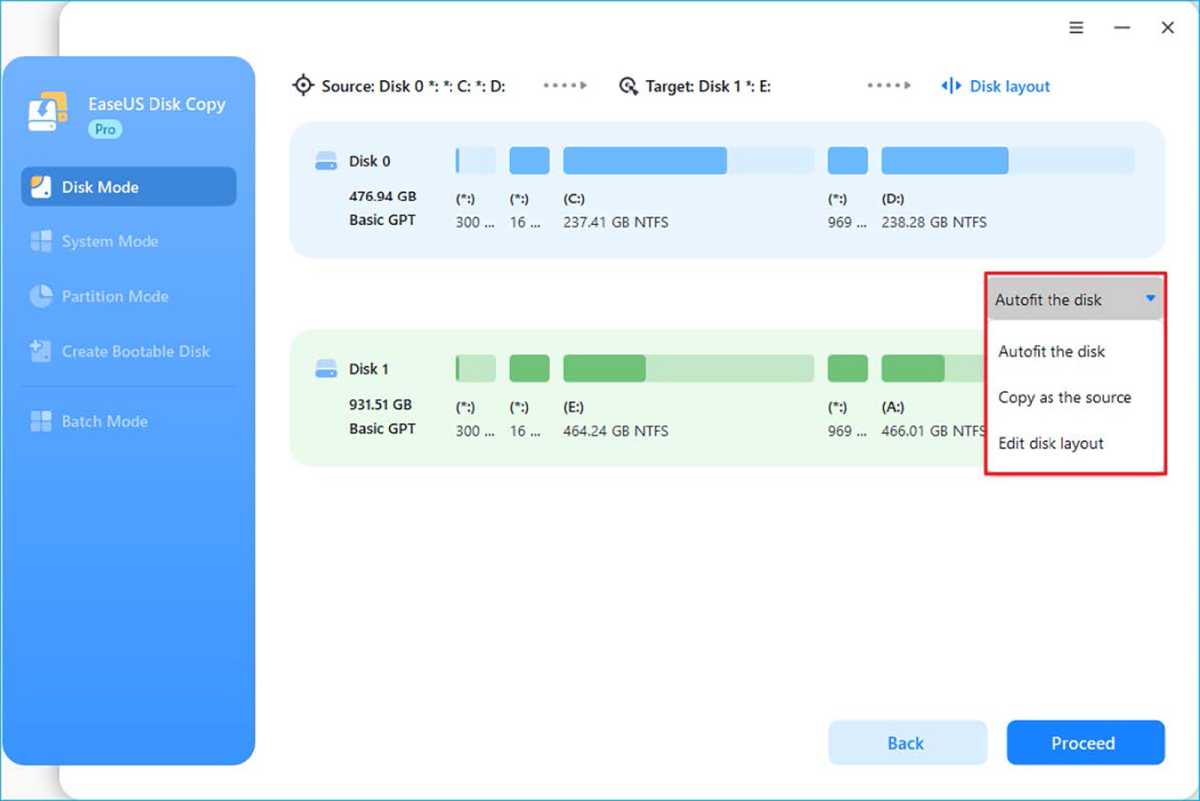
EaseUS
- “Autofit the disk” will change the target disk layout by default to optimize its performance.
- “Copy as the source” does not modify the target disk, and the disk layout remains the same as the source disk.
- “Edit disk layout” allows you to manually resize and move the partition layout on the destination disk.
Step 5. Start the cloning process. Click “Proceed” to start cloning. The time required depends on the data size and SSD speeds.
Step 6. Boot from the cloned SSD. To use the new SSD as your boot drive: shut down your PC, replace the old SSD, restart your PC, enter BIOS or UEFI settings (press F1/F2/DEL/Esc during startup), and set the SSD as the boot drive.
Method 2. Manual copying and pasting files (for specific files)
If you just want to move basic files–not system files or program files–from one SSD to another, the cut/paste or copy/paste method is the simplest and most direct way to transfer files from one SSD to another SSD. Use your mouse to select the files, right-click, and copy from C to D disk or from one disk to another in Windows File Explorer.
Here is a step-by-step guide on how to transfer data from one SSD to another on PC:
Step 1. Connect the SSD. Connect the target SSD via USB-to-SATA cable to your laptop or install it internally on your desktop.
Step 2. Copy and paste files
- Open Explorer and access the source SSD.
- Choose the files or folders you want to transfer.
- Copy (Ctrl + C) files.
- Go to the destination SSD.
- Paste (Ctrl + V ) files.
Method 3. Back up and Restore data from SSD to another SSD
If you prefer a built-in solution for transferring data, Backup and Restore (Windows 7) allows you to create a system image backup and restore it to a new SSD. This method is suitable for users with specific computer skills.
However, you can’t restore individual files; only the entire image can be restored. You must also regularly recreate the image to ensure you have the latest version of your Windows environment and data. Here is how to use Backup and Restore to copy data from one SSD to another:
Step 1. Create a system image backup on one external disk
- Connect the external disk via USB-to-SATA cable to your laptop or install it internally on your desktop.
- Go to Control Panel and select Backup and Restore (Windows 7).
- Click Create a system image and select the target SSD to save the system image backup.
- Choose which drive to back up, confirm your backup settings, and press Start backup.
If Windows cannot boot on its own, you may also need to create a system repair disc or a recovery USB drive.
Step 2. Restore the system image to the new SSD
Ensure your backup media (external disk where the system backup is stored) and the new SSD are plugged in or inserted.
- In Windows 10, go to Settings > Update and Security > Recovery and click Restart now under Advanced startup.
- In Windows 11, go to Settings > System > Recovery and click Restart now near Advanced startup.
When your PC reboots, you will enter Windows Recovery Environment (WinRE). Go to: Troubleshoot > Advanced options > See more recovery options > System Image Recovery > Select a system image > Use the latest available system image (recommended) > Select Format and repartition disks (for restoring to a new disk, you’d better enable this option) > Click Finish.
Then, follow the steps to restore your PC with the system image. If your PC won’t boot at all, boot it with the system repair disc. You will be taken to the Choose an option window, and you can follow the same steps to restore Windows and your data to the previous state.
If you don’t want to replace your old SSD or use the target SSD as your boot drive, directly back up data/files from the old SSD to the new one.
What to do after transfering files/data from one SSD to another
After you migrate data from one SSD to another, perform a thorough verification to ensure everything is working correctly.
- Verify that all files are transferred correctly and accurately.
- Confirm that all file types can be opened without issues.
- Verify whether the data is integrated correctly with your migration goals.
- Verify whether user experience and computer performance are enhanced.
- Run some apps to test system features or network connections.
- Verify whether the system’s functionality and usability are satisfactory.
- Format the old SSD in Disk Management for reuse.
Troubleshoot common SSD data transfer issues
1. Drive not detected
- Ensure cables/connections are secure.
- Update SATA/NVMe drivers.
2. Cloning errors
- Close background apps to free up resources.
3. Cloned hard drive won’t boot
- Verify boot partition flags.
- Update BIOS/UEFI.
- Check BIOS boot order.
- Rebuild BCD.
4. Slow PC performance
- Update necessary drivers.
- Verify connection type (USB/SATA).
Conclusion
This article covers three methods to transfer data from one SSD to another, including performing SSD cloning, manually copying and pasting, and using Windows Backup and Restore. If you try the Backup and Restore, you must reinstall drivers and apps. Manual methods work for small data transfer sizes, but cloning is the best way to transfer everything from one SSD to another without reinstalling or losing data.
If you want a hassle-free solution, try SSD cloning with EaseUS Disk Copy. It lets you migrate all the data from one SSD to another without losing data or reinstalling anything. EaseUS SSD clone software enables you to move data from one SSD to another with the time of a cup of coffee. Try it now!
https://www.pcworld.com/article/2686741/how-to-transfer-data-from-one-ssd-to-another.html
Autentifică-te pentru a adăuga comentarii
Alte posturi din acest grup

The NHL postseason begins Saturday, April 19. Games will air on ESPN,

A mini PC can be a great, affordable alternative to a laptop if you d

Back at CES 2025, Samsung revealed their latest monitors including th

Secure Annex cybersecurity researcher John Tuckner has identified 57

I block every single ad on YouTube. And I’m a hypocrite for doing it.

Discord has started restricting some users from accessing sensitive c